Microsoft Office
How To Delete Cells, Rows, Columns and Spreadsheets in an Excel Workbook?
In a previous post of mine, I had mentioned How To Insert Cell, Cells, Row, Rows, Column, Columns and Sheet, Sheets in a Excel Workbook. What happens though, when we come to a point that we want to Delete Cell, Cells, Row, Rows, Column, Columns and Sheet, Sheets in a Excel Workbook. All you need to do is to continue reading this post.
Πώς Να Εισάγουμε Κελιά, Γραμμές, Στήλες και Φύλλα Εργασίας Σε Ένα Βιβλίο Εργασίας του Excel
How To Insert Cells, Rows, Columns and Spreadsheets in an Excel Workbook
Όλοι μας σε κάποια στιγμή όταν δουλεύουμε σε ένα Βιβλίο Εργασίας του Excel (Workbook), θέλουμε να Εισάγουμε ένα Κελί (Cell), Κελιά (Cells), ή θέλουμε να Εισάγουμε (Insert) Γραμμή (Row), Γραμμές (Rows), Στήλη (Column), Στήλες (Columns) ή ακόμα και ολόκληρο Φύλλο Εργασίας (Worksheet). Πώς γίνεται; Η διαδικασία είναι αρκετά απλή και γρήγορη, οπότε δεν χρειάζεται να ανησυχούμε εάν έχουμε ξεχάσει να εισάγουμε κάποια δεδομένα όταν δεν υπάρχει διαθέσιμος χώρος. Απλώς συνεχίστε να διαβάζεται την παρακάτω ανάρτηση.
How To Insert Cells, Rows, Columns and Spreadsheets in an Excel Workbook?
We have all come to a point when we are working in an Excel Workbook, where we need to Insert a Cell or Cells, or we need to Insert a Row, Rows or Column, Columns or even to Insert an entire Worksheet. How is it done? The procedure is quite simple and very handy, so we don’t need to worry if we have forgotten to insert some data and there is not enough space for us. Just keep on reading the post below.
For us to Insert Cells in a Spreadsheet, we must select the area of Cells that we need to Insert as shown in the image below. The number of Cells selected, the same amount will be Inserted in our Spreadsheet.
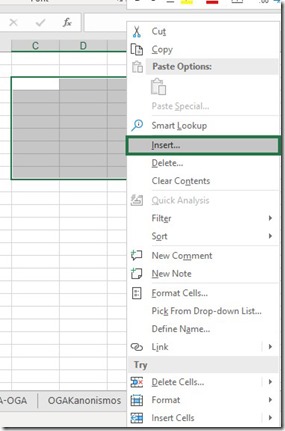
Once the area of Cells is selected, there are two ways to Insert Cells. The first one, is to do a right click with our mouse on top of the selected area, and then from the shortcut menu that appears, we select the command Insert as shown below.
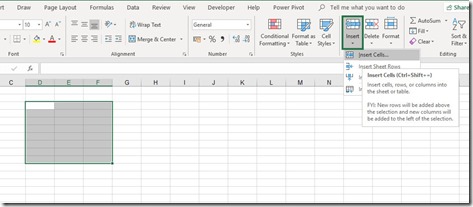
The second way is from the Home tab, we locate the area named Cells of the ribbon as shown below and then we select the command Insert and from the drop-down menu we select the command Insert Cells.
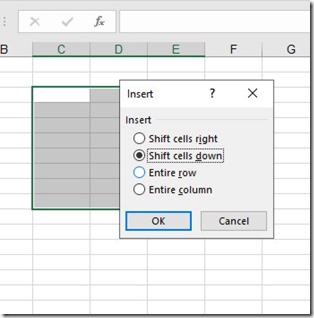
When we choose to Insert Cells, new Rows will be added above of the selection and new Columns will be added to the left of the selection. Whatever way we choose, the same dialog box will appear which is named Insert, where we have the following options to choose from:
-
Shift Cells Right
-
Shift Cells Left
-
Entire Row
-
Entire Column
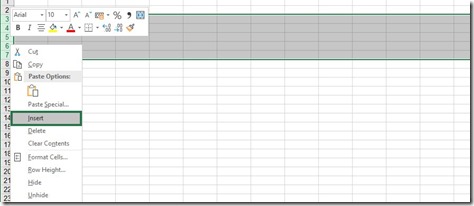
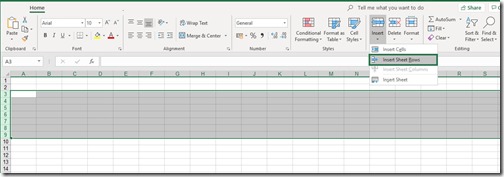
For us to Insert Rows in a Spreadsheet, we must select the number of Rows that we want to Insert. When we Insert Rows, the same number of Rows selected will be inserted of the top of the selected Rows. The first way to Insert Rows, is to do a right click with our mouse on top of the selected Rows and then from the shortcut menu that appears we select the command Insert.
The second way is from the Home tab, we locate the area named Cells of the ribbon as shown below and then we select the command Insert and from the drop-down menu we select the command Insert Sheet Rows. As mentioned above, the same number of selected Rows will be Inserted above the selection.
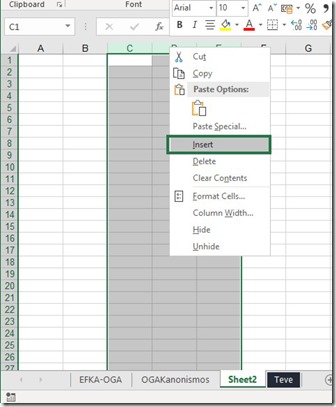
For us to Insert Columns in a Spreadsheet, we must select the number of Columns that we want to Insert. When we Insert Columns, the same number of Columns selected will be inserted at the left of the selected Columns. The first way to Insert Columns, is to do a right click with our mouse on top of the selected Columns and then from the shortcut menu that appears we select the command Insert.
The second way is from the Home tab, we locate the area named Cells of the ribbon as shown below and then we select the command Insert and from the drop-down menu we select the command Insert Sheet Columns. As mentioned above, the same number of selected Columns will be Inserted at the left of the selection.
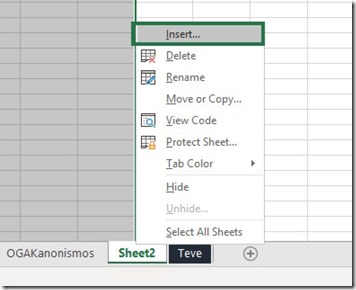
For us to Insert a Spreadsheet in our Workbook, the first way is to move on top of a Sheet that already exists in our Workbook, and then do a right click with our mouse. Whenever we Insert a Spreadsheet in our Workbook, the Spreadsheet will be inserted at the left of the selected Spreadsheet. From the shortcut menu that appears we select the command Insert as shown in the image below.
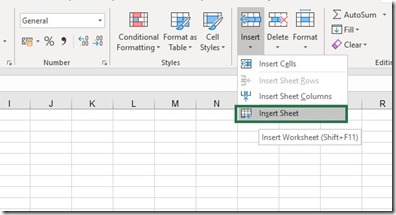
The second way is from the Home tab, we locate the area named Cells of the ribbon as shown below and then we select the command Insert and from the drop-down menu we select the command Insert Sheet. As mentioned above, the Spreadsheet will be Inserted at the left of the selected Sheet.
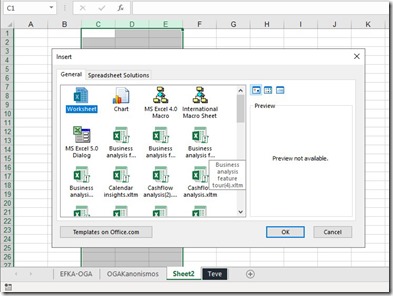
Whatever way we choose, the same dialog box will appear which is named Insert, where we have the following options to choose from so, we can Insert a Sheet in our Workbook:
Worksheet, Chart, MS Excel 4.0 Macro, International Macro Sheet, MS Excel 5.0 Dialog and many more. We select the Sheet that we want and need to Insert and the press the Ok button located at the bottom right corner of the Insert dialog box.
Below you can check out the video describing How To Insert Cells, Rows, Columns and Spreadsheets in an Excel Workbook.
Don’t Forget to Subscribe To My YouTube Channel.
Πώς Να Ελέγξουμε Το Έγγραφό Μας Για Γραμματικά, Ορθογραφικά & Άλλα Λάθη στο Word;
How To Check Your Document For Grammar, Spelling and Other Mistakes in our Word Document?
Ορθογραφία (Spelling), Γραμματική (Grammar), Βελτιώσεις (Refinements), Σαφήνεια & Συνοπτικότητα (Clarity & Conciseness), Γλώσσα Περιεχομένου (Inclusive Language), Σημεία Στίξεως (Punctuation), Επιλογές Λεξιλογίου (Vocabulary Choices) και άλλα πολλά. Αυτά είναι όλα λάθη που συχνά εμφανίζονται όταν δουλεύουμε σε ένα Έγγραφο (Document) του Word. Πώς τα διορθώνουμε όμως, έτσι ώστε το Έγγραφό (Document) μας να εμφανίζεται άκρως επαγγελματικό, ελκυστικό και πάνω από όλα χωρίς λάθη; Ευτυχώς που εδώ κάνει την εμφάνισή του το Παράθυρο Εργασιών Πρόγραμμα Επεξεργασίας (Editor Task Pane). Απλώς συνεχίστε να διαβάζετε την παρακάτω ανάρτηση για να μάθετε πώς δουλεύει το Παράθυρο Εργασιών Πρόγραμμα Επεξεργασίας (Editor Task Pane).
How To Check Your Document For Grammar, Spelling and Other Mistakes in our Word Document?
Spelling, Grammar, Refinements, Clarity & Conciseness, Inclusive Language, Punctuation Conventions, Vocabulary Choices and many more to show up. These are all mistakes that we make usually when we work in a Word Document. How do we solve them though for our Document to be efficient and error free? Well, luckily this is where the Microsoft Word Editor comes along. Just continue to read the post below to find out how the Editor task pane works in Microsoft Word.
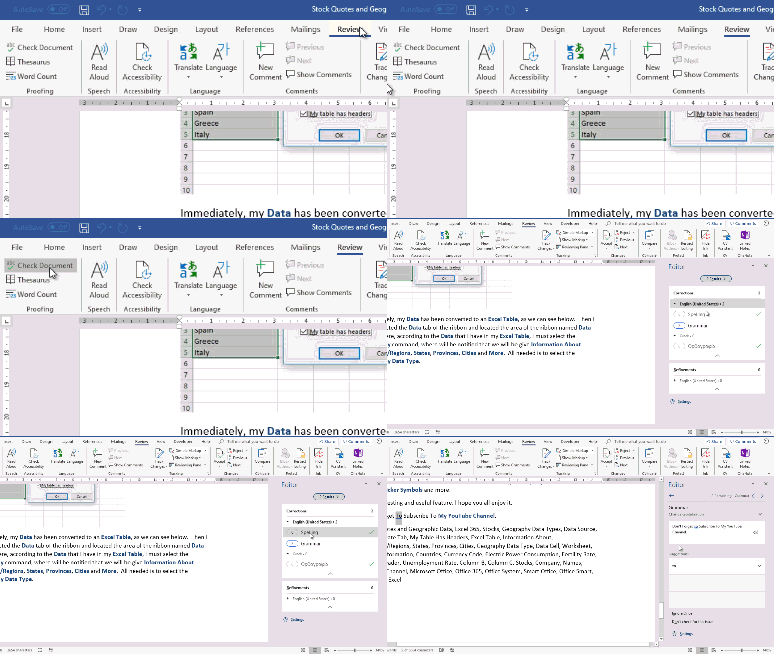
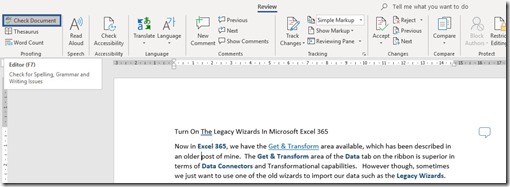
We must select the Review tab and then from the far left of the ribbon we located the area named Proofing as shown in the image below.
Once we locate the Proofing area of the Review tab, we select the command Check Document as shown below, where we are notified that we Can Check For Spelling, Grammar and Writing Issues.
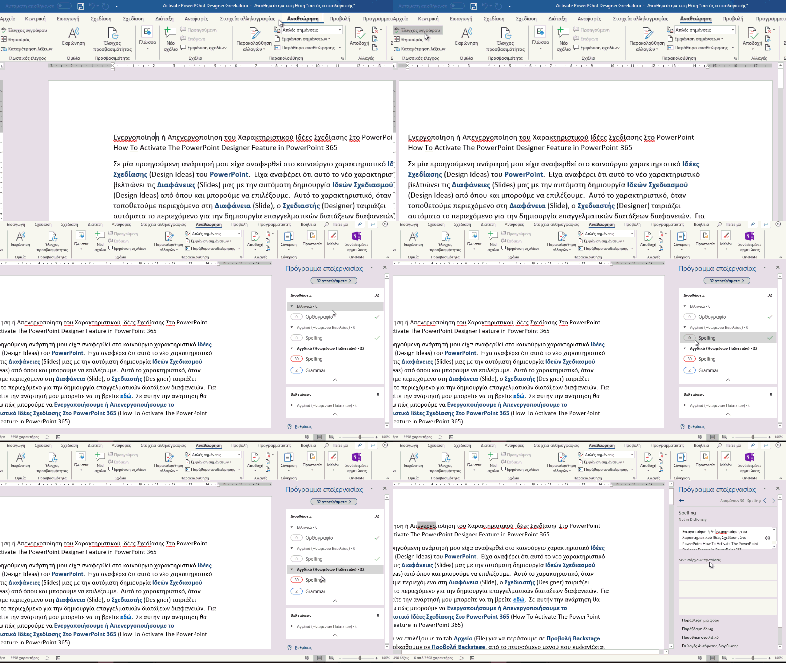
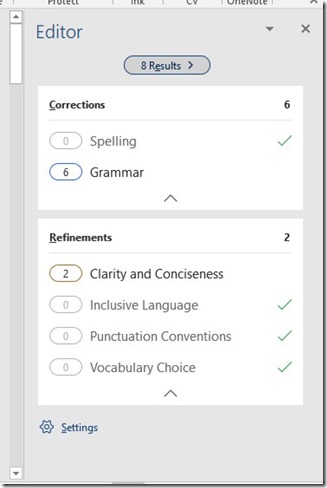
Once we select the Check Document command, at the right of our window the Editor Task Pane appears. In my example below, the Editor task pane shows 8 (eight) Results. We have two main categories that appear that have to do with our Document.
First, we have the Category Corrections: The Corrections category is separate in two subcategories. The Spelling, which at the right we notice the Check Mark, meaning that there are no Spelling Issues in our Document. The Grammar subcategory, where at the left we see the number 6 (Six), meaning that we have 6 Grammar Mistakes in our Document.
Secondly, we have the Refinements category: The Refinements category is separated in 4 (Four) different subcategories. The Clarity and Conciseness subcategory, where at the left we see the number 2 (two), meaning that we have 2 Clarity & Conciseness errors in our Document. The Inclusive Language, the Punctuation Conventions, and the Vocabulary Choice which all have the check mark at the right, meaning that we have no mistakes.
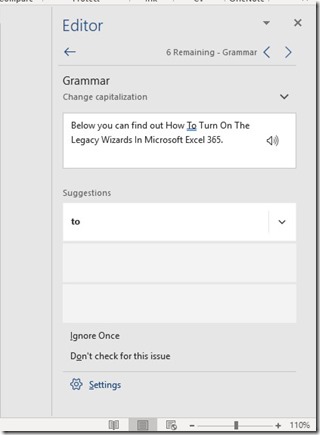
Wherever there is a check mark, meaning that we have no errors in our Document, we do not need to take any actions. Wherever there is a number located at the left of each subcategory, meaning that we have errors in our Document, we need to select that subcategory in order to take action. The Editor task pane will navigate us at that Error in our Document and will give us a suggestion in order for us to correct it. In the image below, we see that we have a Grammar mistake in our Document, and we can also notice the Suggestion, mentioning Change Capitalization. In the middle of the Editor task pane, we can see where our mistake is, and right below we have the Suggestion in what to change the Mistake To.
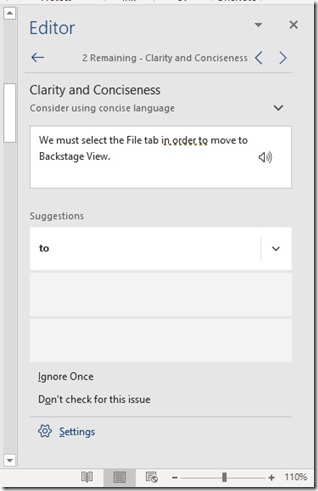
In the next image, I have selected the subcategory Clarity and Conciseness, where the Editor task pane, navigates us to the mistake. Right below, we have the Suggestion, mentioning Consider Using Concise Language and underneath we have the Suggestion in what to change the Mistake To.
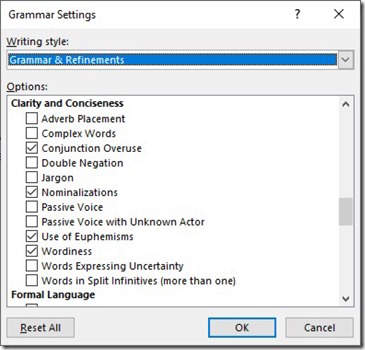
At the bottom of the Editor task pane, we have the options to Ignore Once the mistake by pressing on the command, or the option Don’t Check For This Issue, so we can just ignore the mistake for this occurrence. At the end, we have the Settings command, where if we select it, the Grammar Settings dialog box will appear where we can activate or deactivate commands.
That is it! Now, we have an error free from mistakes (any kind) Word Document. Simple procedure, and easy to work with Editor Task Pane that is available in Microsoft Word.
Below you can check out the video describing How To Check Your Document For Grammar, Spelling and Other Mistakes in our Word Document?
Don’t Forget To Subscribe To My YouTube Channel.
Ποιές Είναι Οι Δυνατότητες OpenType Στο Microsoft Word;
Which Are The OpenType Fonts Features in Microsoft Word?
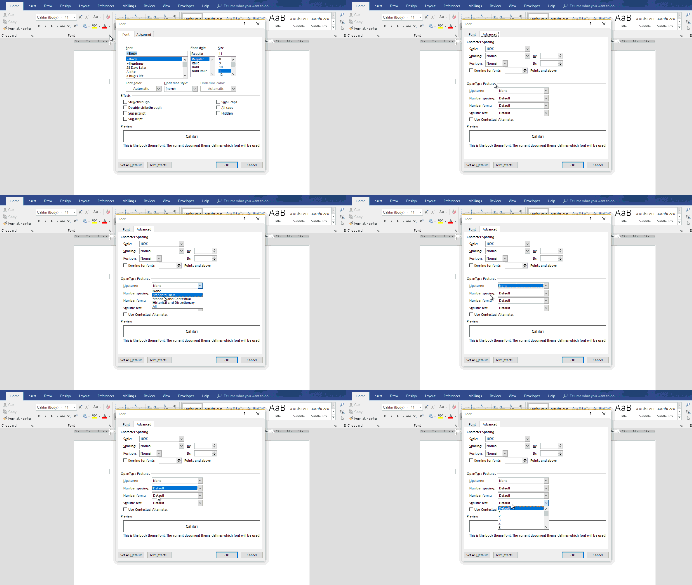
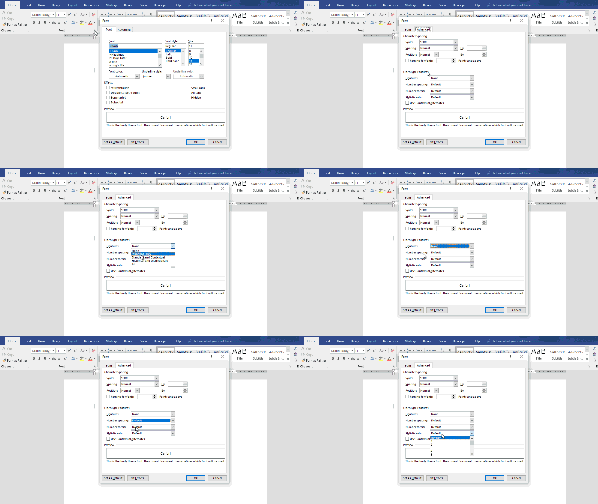
Ορολογία Δίψηφα: Είναι ένας γραπτώς ή εκτυπωμένος χαρακτήρας που αποτελείται από δύο ή περισσότερα γράμματα ή χαρακτήρες που είναι ενωμένα μαζί. Το Word αποτελείται από πολλές κατηγορίες Γραμματοσειρών (Fonts) και Στυλ Γραμματοσειρών (Font Styles). Εκτός από τις βασικές κατηγορίες Στυλ Γραμματοσειρών (Font Styles), περιλαμβάνει και κάποια προχωρημένα Στυλ Γραμματοσειρών (Font Styles ) στην Κατηγορία Δίψηφα Γράμματα (Ligature Category). Τα Δίψηφα Γράμματα (Ligature) περιλαμβάνει διάφορα σετ στυλ, μορφές αριθμών και αποστάσεις γραμμών που κάνει το Έγγραφό (Document) να εμφανίζεται πιο καλλιτεχνικό. Σε αυτήν την ανάρτηση θα περιγράψω τις Δυνατότητες Χαρακτήρων OpenType που είναι διαθέσιμες στο Microsoft Word έτσι ώστε να μπορέσουμε να πειραματιστούμε.
Which Are The OpenType Fonts Features in Microsoft Word?
Definition of Ligature: a printed or written character (such as æ or ff) consisting of two or more letters or characters joined together.
Word contains many Font families and Font Styles. Apart from the basic Font Styles, it also includes some advanced Font Styles in Ligature Category. Ligatures contain different stylistic sets, number formats, number spacing styles that makes our Document look more artistic. In this post I will describe the OpenType Features that are available in Microsoft Word so we can experiment with.
Τι Είναι & Τι Κάνει Η Γραμμή Εστίασης Στο Microsoft Word;
What Is The Line Focus Feature available in Microsoft Word?
Σε προηγούμενη ανάρτησή μου, είχα αναφερθεί στα Εργαλεία Εκμάθησης (Learning Tools) που είναι διαθέσιμα στο Microsoft Word 365 και μπορείτε να βρείτε εδώ. Η Microsoft έχει δημιουργήσει τα Εργαλεία Εκμάθησης (Learning Tools) που θα βοηθήσει τους χρήστες να αναπτύξουν και να βελτιώσουν τις ακόλουθες ικανότητες:
-
Αποκωδικοποίηση (Decoding): Είναι η ικανότητα να εκφωνούμε λέξεις με τον σωστό τρόπο.
-
Άριστη Γνώση (Fluency): Είναι η ικανότητα να διαβάζουμε γρήγορα και με ακρίβεια.
-
Κατανόηση (Comprehension): Είναι η ικανότητα να κατανοούμε τι διαβάζουμε.
Για να δούμε λοιπόν πώς τα Εργαλεία Εκμάθησης (Learning Tools) δουλεύουν στο Microsoft Word 365. Το μόνο που πρέπει να κάνετε είναι να συνεχίσετε να διαβάζεται.
What Is The Line Focus Feature available in Microsoft Word?
In a previous post of mine I had mentioned about the Learning Tools that are available in Microsoft Word 365 and you can find here. Microsoft has built the Learning Tools that will help all the users develop and enhance the following abilities:
-
Decoding: it is the ability to pronounce words the right way.
-
Fluency: it is the ability to read quickly and accurately.
-
Comprehension: it is the ability to understand what we read.
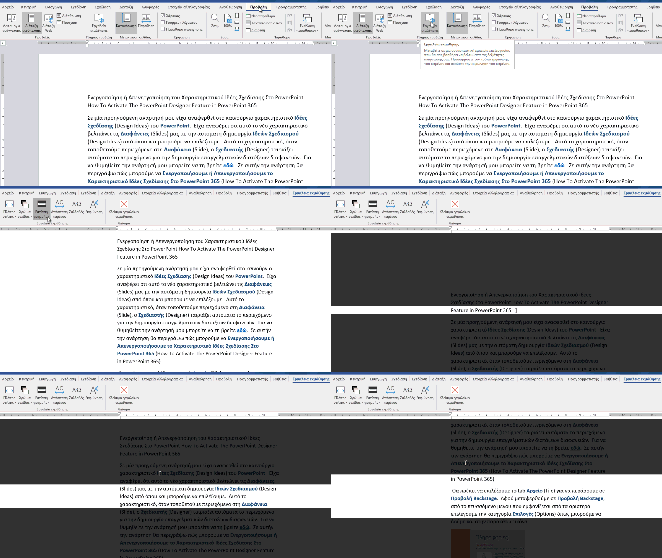
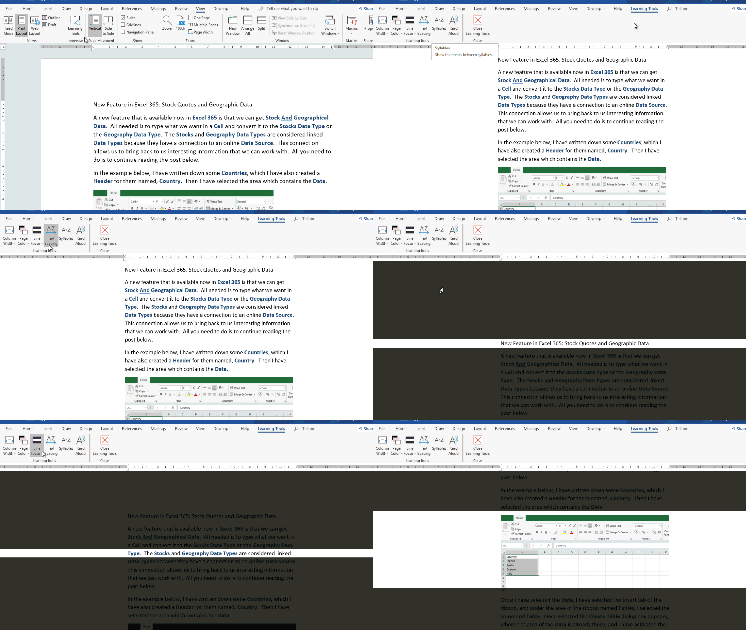
The new feature available in Learning Tools is the Line Focus command. What does it do? It removes distractions so we can move through a Document Line by Line. We can adjust the Focus to put One, Three or Five Lines in View at a time. All you need to do is to continue reading the post below to find out how the Line Focus command works.


