Office System


Πώς Να Αποθηκεύστε Διαφάνειες Μίας Παρουσίασης Ως Αρχεία Εικόνας SVG;

How to Save PowerPoint Slides as SVG Files?
Στο PowerPoint, έχουμε τη δυνατότητα να Αποθηκεύσουμε (Save) τις Διαφάνειες (Slides) μίας Παρουσίασης (Presentation) σε πολλούς διαφορετικούς Τύπους Αρχείων (File Formats) συμπεριλαμβανομένου και Τύπους Εικόνας (Image Files) όπως JPEG, Bmp, Emf, Tif και πολλούς άλλους. Τώρα έχουμε τη δυνατότητα να αποθηκεύσουμε τις Διαφάνειες (Slides) της Παρουσίασης (Presentation) ως Τύπου SVG. Διαδικασία η οποία θα περιγραφεί στην παρακάτω ανάρτηση.

How to Save PowerPoint Slides as SVG Files?

In PowerPoint, we were able to Save our Presentation Slides in many other Formats including Image Files such as JPEG, Bmp, Emf, TIf and many others. Now we can also Save our Presentations Slides as SVG Files. Procedure that will be described in the following post.

First of all, what is a SVG File: A file with the SVG file extension is most likely a Scalable Vector Graphics file. Files in this format use an XML-based text format to describe how the image should appear. Since text is used to describe the graphic, an SVG file can be scaled to different sizes without losing quality—in other words, the format is resolution independent. This is why website and print graphics are often built in the SVG format, so they can be resized to fit different designs in the future. Source: https://www.lifewire.com/svg-file-4120603
In the image below, we can see our Presentation and all the Slides that contain it.

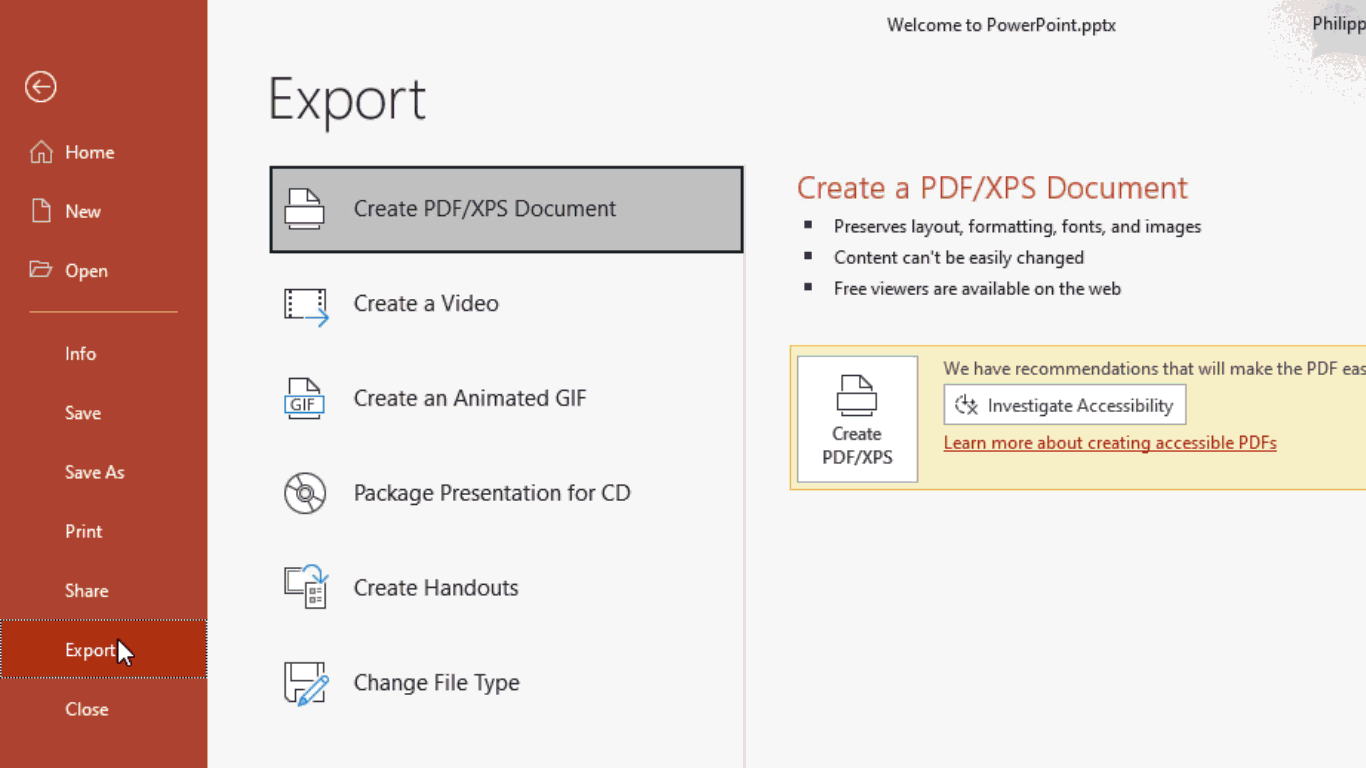
Then, we must select the File tab so we can move into Backstage View, and then from the left of the task pane we select the category Export as shown below. Then from the middle of the Export task pane we select the command Change File Type as we can see.

Once the Change File Type command is selected from the Export area of the task pane, at the right we can see most of the available File Types that we can change our Presentation into. This area is separated into three categories of File Types which are the following:
-
Presentation File Types
-
Image File Types
-
Other File Types
In order for us to Save our Presentation as an SVG Image File, we must select the Save As command located under the area named Other File Types as shown in the image below.

Once we select the command Save As, the Save As dialog box appears as shown below. In this dialog box, we select the drop-down menu at the right of the command Save As Type. Once the drop-down menu appears, we locate and select Scalable Vector Graphic Format (*.svg).

Next, we define where the File will be stored and then in the text pane next to the command File Name, we type in the Name that we want for our File. Finally, we press the Save button and that is it. Our Presentation will be saved as a Scalable Vector Graphics Format (*.svg).

Once we select the Save command an Informational Microsoft Dialog box appears, asking us Which Slides Do We Want To Export?
We can either select All Slides, Just This One (meaning the active Slide) or Cancel (we cancel the procedure).

Once we have selected what we want, again an Informational Microsoft PowerPoint dialog box appears, mentioning: Each Slide In Our Presentation Has Been Saved As A Separate File In the Folder ******

A simple and quick procedure, exporting our Presentations Slides into Scalable Vector Graphics Format (*.svg).
Below you can check out the video describing How To Save PowerPoint Slides as SVG Files.
Don’t Forget To Subscribe To My YouTube Channel.

How to Save PowerPoint Slides as SVG Files?

In PowerPoint, we were able to Save our Presentation Slides in many other Formats including Image Files such as JPEG, Bmp, Emf, TIf and many others. Now we can also Save our Presentations Slides as SVG Files. Procedure that will be described in the following post.
Πώς Να Εισάγουμε Κουμπιά Ενεργειών Σε Διαφάνειες Του PowerPoint;

How To Insert Action Buttons in a PowerPoint Presentation?
Στο PowerPoint, μπορούμε να εισάγουμε ενσωματωμένα σχήματα κουμπιών που να συνδέονται με μία Άλλη Διαφάνεια (Another Slide), να αναπαράγουνε έναν Ήχο (Sound) ή να εκτελέσουν κάτι άλλο. Αυτά τα ενσωματωμένα σχήματα κουμπιών είναι γνωστά ως κουμπιά Ενέργειας (Actions). Μπορούμε να καθορίσουμε το τι θα εκτελέσουν αυτά τα κουμπιά Ενέργειας (Actions) όταν κάνει κάποιος κλικ πάνω τους ή περάσουν με το ποντίκι από πάνω τους. Για να μάθετε περισσότερα για το πώς μπορούμε να Εισάγουμε Κουμπιά Ενεργειών Σε Μία Παρουσίαση του (Insert Action Buttons in a Presentation) PowerPoint απλώς συνεχίστε να διαβάζετε την παρακάτω ανάρτηση.

How To Insert Actions in a PowerPoint Presentation?

In PowerPoint we can add to our Presentations built-in button shapes and set them to link to Another Slide, play a Sound or perform something else. These built-in buttons are known as Actions. We can define these Action buttons to be executed when someone clicks or moves the mouse over them. To find out more about adding Actions in a PowerPoint Presentation just keep on reading the post below.

We must select the Insert tab and then locate the area of the ribbon named Links as shown below. Once we have located the Links area, we select the command Action. Here we are notified that we can Give The Selected Object An Action To Carry Out When You Click It Or Mouse Over It. For Example We Can Hover Over An Object To Jump To The Next Slide, Or Open Up A New Program When We Click It.

Once we select the Actions command, the Action Settings dialog box appears. The Actions Settings dialog box is separated by two tabs: The Mouse Click tab and the Mouse Over tab.

In the next image I have activated the Mouse Click tab and I have activated the check box at the left of the command Hyperlink To: Once selected the drop down menu appears where we can select from the following options.
-
Next Slide: We will just move to the Next Slide
-
Previous Slide: We will just move to the Previous Slide
-
First Slide: No matter which Slide we are, we will move to the First Slide
-
Last Slide: No matter which Slide we are, we will move to the Last Slide
-
Last Slide Viewed: No matter which Slide we are, we will move to the Last Viewed Slide
-
End Show: We will End the Presentation Show
-
Custom Show…: If we have created a Custom Show, we can select it in order for it to be displayed. To find out how to create a Custom Show follow the link here.
-
Slide…: We can define to which Slide we want to appear
-
URL…: We can define an URL address to open, once the Action is selected.
-
Other PowerPoint Presentation: We can define for another PowerPoint Presentation to open.
-
Other File: We can define for another File to be opened once the Action is selected.

In the next image, from the Actions Settings dialog box I have activated the check box next to the command Hyperlink To and then selected from the drop-down menu URL. Once the URL command is selected the Hyperlink To URL dialog box appears, where in the text area we type in the Address of the URL, we want the Action to follow once clicked.

Once we have finished typing the URL Address, we press the OK button to return to the Actions Settings dialog box. In the next image, I have activated the Play Sound command, and then I have selected the drop-down menu, where we can see all the available Sounds that we can choose from. We just select the Sound that we want, and when we set the Action in motion the Sound that we selected will play also.

In the next image, we can see all the settings that we have made for our Action in our PowerPoint Presentation. At the bottom of the Action Settings dialog box, I have also activated the command Highlight Click. Meaning that when we click on our Action to take place, the click that we will do will be Highlighted also so it will become notable.

In the Actions Settings dialog box, we can also use for our Actions one of the following commands:
-
Run Program: Once selected, we will have to navigate so we can select the Program that we want to be run, once the Action is selected.
-
Object Action: Once selected, we will have to navigate so we can select the Action that we want to run, once the Action is selected.
In the next image, from the Action Settings dialog box, I have activated the Mouse Over tab where we can see the same commands there as with the Mouse Click tab. The difference is that with the Mouse Click tab, we actually have to click on our Action to take effect, and with the Mouse Over, we just have to move over the Action with our Mouse for our Action to take effect.

Below you can check out the video describing How To Insert An Action in a PowerPoint Presentation?
Don’t Forget To Subscribe To My YouTube Channel.

Πώς Να Εισάγεται Σύμβολα Σε Διαφάνειες του PowerPoint;

How To Quickly Add Symbols in PowerPoint?
Μπορούμε πολύ εύκολα να εισάγουμε ένα ειδικό χαρακτήρα, ένα κλάσμα, ένα σύμβολο νομίσματος ή οποιοδήποτε άλλο Σύμβολο (Σύμβολο) που δεν βρίσκεται στο πληκτρολόγιό μας σε μία Διαφάνεια (Slide) του PowerPoint, σε ένα Έγγραφο (Document) του Word ή σε ένα Φύλλο Εργασίας (Spreadsheet) του Excel. Εκατοντάδες Σύμβολα (Symbols) δεν είναι διαθέσιμα στο πληκτρολόγιό μας. Αυτό που θα πρέπει να έχουμε υπόψη μας, είναι ότι το Σύμβολο (Symbol) που χρησιμοποιούμε εξαρτάται από τον Τύπο της Γραμματοσειράς (Font) που χρησιμοποιούμε. Για να μάθετε πώς να Εισάγουμε Σύμβολα Σε Μία Παρουσίαση του PowerPoint (How To Add Symbols in a PowerPoint Presentation?).

How To Quickly Add Symbols in a PowerPoint Slide?

We can easily add a special character, fraction, currency symbol or any other Symbol that is not on our keyboard in a Microsoft PowerPoint Presentation, Microsoft Word Document or Microsoft Excel Spreadsheet. Hundreds of Symbols are not available on our keyboard. Then thing that we must keep in mind is that we must realize that the Symbol depends on which Font we use. To find out How To Insert a Symbol in a PowerPoint Presentation just keep on reading the post below.

Πώς Να Εισάγεται Αρίθμηση Διαφανειών Σε Παρουσίαση Του PowerPoint;
How To Quickly Add Slide Numbers In a PowerPoint Presentation?
Η διαδικασία Αρίθμησης Διαφανειών (Slide Numbers) σε μία Παρουσίαση (Presentation) του PowerPoint είναι απλή και γρήγορη. Όταν εισάγουμε Αρίθμησης Διαφανειών (Slide Numbers), αυτές θα εφαρμοστούν σε όλες τις Διαφάνειες (Slides) και θα συμπεριληφθούν στην καταμέτρηση Διαφανειών (Slide), συμπεριλαμβανομένου και οι Διαφάνειες (Slides) η οποίες είναι Κρυφές (Hidden). Η Αρίθμηση Διαφανειών (Slide Numbers) είναι στοιχεία ελέγχου του Υποσέλιδου (Footer). Δηλαδή, η Αρίθμηση Διαφανειών (Slide Numbers) θα εμφανίζονται σε όλες τις Διαφάνειες (Slides) της Παρουσίασης (Presentation), απλώς επιλέγοντας την εντολή Εφαρμογή Σε Όλες (Apply To All). Για να μάθετε Πώς Να Εισάγεται Αρίθμηση Διαφανειών Σε Παρουσίαση Του PowerPoint; (How To Quickly Add Slide Number In A PowerPoint Presentation?) συνεχίστε να διαβάζετε την παρακάτω ανάρτηση.

