Month: June 2022

Πώς Να Μορφοποιήσετε Δεδομένα Ως Ημερομηνίες Σε Φύλλο Εργασίας του Microsoft Excel;

Posted on Updated on


Microsoft Excel Blog Banner

How To Format Data As Dates in a Microsoft Excel Spreadsheet?

Όταν εισάγουμε Δεδομένα (Data) στο Microsoft Excel, αυτά αποθηκεύονται ως Αριθμοί (Numbers). Όταν καταχωρούμε Ημερομηνίες (Dates) αυτά μορφοποιούνται αυτόματα έτσι ώστε να εμφανίζονται σαν Ημερομηνίες (Dates). Για παράδειγμα, όταν καταχωρούμε 20/4 αυτό θα αλλάξει και θα εμφανίζεται ως 20-Απριλίου. Αυτό μπορεί να είναι ενοχλητικό, ειδικά όταν θέλουμε να καταχωρίσουμε κάτι το οποίο υποτίθεται ότι δεν θέλουμε να εμφανίζεται ως Ημερομηνία (Date) ή να θέλουμε να εμφανίσουμε μία άλλη μορφή Ημερομηνίας (Date). Εξ’ ορισμού, δεν υπάρχει τρόπος για να το αλλάξουμε. Οι Αριθμοί (Numbers) που αντιπροσωπεύουν τις Ημερομηνίες (Dates) είναι Σειριακοί Αριθμοί (Serial Numbers). ΟΙ Σειριακοί Αριθμοί (Serial Numbers) ξεκινούν από την 1η Ιανουαρίου του 1900.

Πώς Να Μορφοποιήσετε Δεδομένα Ως Ημερομηνίες Σε Φύλλο Εργασίας του Microsoft Excel

Εάν Θέλετε Να Μάθετε Πώς Να Μορφοποιήσετε Δεδομένα Ως Ημερομηνίες Σε Φύλλο Εργασίας του Microsoft Excel (How To Format Data As Dates in a Microsoft Excel Spreadsheet) διαβάστε την παρακάτω ανάρτηση.


Read the rest of this entry »

How To Format Data As Dates in a Microsoft Excel Spreadsheet?

Posted on Updated on

Microsoft Excel Blog Banner

When we enter Dates in Microsoft Excel, they are stored as Numbers. When we enter Dates they are formatted automatically to be displayed as Dates. When we enter for example, 20/4 it will change to 20-April. This can be annoying when we enter something that is not meant to be displayed as a Date or we want to display a different format of the Date. By default, there is no way we can change it. The Numbers that represent the Dates are Serial Numbers. Serial Numbers start from January 1st, 1900.

How To Format Data As Dates in a Microsoft Excel Spreadsheet

If You Want To Learn How To Format Data As Dates in a Microsoft Excel Spreadsheet, read the post that follows. Read the rest of this entry »

Πώς Να Σταθεροποιήσετε Τμήματα Παραθύρου Σε Ένα Φύλλο Εργασίας Στο Microsoft Excel;

Posted on Updated on

Microsoft Excel Blog Banner

How To Freeze Panes in a Microsoft Excel Spreadsheet?

Στο Microsoft Excel και σε μία περιοχή του Φύλλου Εργασίας (Worksheet) ή αλλιώς Υπολογιστικό Φύλλο (Spreadsheet), έχουμε τη δυνατότητα να διατηρήσουμε μία περιοχή ορατή ενώ κάνουμε κύλιση σε μία άλλη περιοχή. Με αυτόν τον τρόπο, μπορούμε να κλειδώσουμε συγκεκριμένες Γραμμές (Rows) και Στήλες (Columns). Παγώνει μία Γραμμή (Row) ή Στήλη (Column), έτσι ώστε πάντα να εμφανίζεται είτε πλοηγούμαστε προς τα πάνω ή προς τα κάτω, είτε προς τα αριστερά ή δεξιά στο Φύλλο Εργασίας (Spreadsheet).

Πώς Να Σταθεροποιήσετε Τμήματα Παραθύρου Σε Ένα Φύλλο Εργασίας Στο Microsoft Excel

Εάν Θέλετε Να Μάθετε Πώς Να Σταθεροποιήσετε Τμήματα Παραθύρου Σε Ένα Φύλλο Εργασίας Στο Microsoft Excel;, διαβάστε την παρακάτω ανάρτηση.

Read the rest of this entry »

How To Freeze Panes in a Microsoft Excel Spreadsheet?

Posted on Updated on

Microsoft Excel Blog Banner

In Microsoft Excel and in an area of a Spreadsheet or Worksheet, we can keep an area visible while we scroll to another area. This is how we can lock specific Rows and Columns. It Freezes a Row or Column, so this way it is always displayed even if we navigate up and down through the Spreadsheet.

How To Freeze Panes in a Microsoft Excel Spreadsheet

If You Want To Learn How To Freeze Panes in a Microsoft Excel Spreadsheet, read the post that follows.

In the image below, I have opened a Microsoft Excel Workbook which contains different Spreadsheets. In this Spreadsheet, I need to Freeze the First Row of Spreadsheet, so when I scroll down through the Data, the First Row will always be visible. That is why I need to activate the Cell A2. Then I must select the View Tab and locate from the right the area of the ribbon named Window as shown below.

How To Freeze Panes in a Microsoft Excel Spreadsheet?

From the Window area of the Ribbon, I select the command Freeze Panes where here I am notified with the following: Freeze A Portion Of The Sheet To Keep It Visible While You Scroll Through The Rest Of The Sheet. This Is Useful For Checking Out Data In Other Parts Of Your Worksheet Without Losing Your Headers Or Labels.

How To Freeze Panes in a Microsoft Excel Spreadsheet?

Once I select the command Freeze Panes the drop-down menu appears with the following commands available to use and which are the following:

Freeze Panes: Keep Rows And Columns And Columns Visible While The Rest Of The Worksheet Scrolls (Based On The Current Selection). By using this command, depending which Cell is activated in the Spreadsheet, the Rows above the activated Cells and the Columns at the left of the activated Cell will remain visible while scrolling Down and scrolling Right in the Spreadsheet.

How To Freeze Panes in a Microsoft Excel Spreadsheet?

Unfreeze Panes: Unlock All Rows And Columns To Scroll Through The Entire Worksheet. If we have used the command Freeze Panes then we can use the command Unfreeze Panes.

How To Freeze Panes in a Microsoft Excel Spreadsheet?

Freeze Top Row: Keep The Top Row Visible While Scrolling Through The Rest Of The Worksheet. No matter which Cell is activated, by using this command the First Row of the Spreadsheet will remain visible while scrolling down in the Spreadsheet. Once used, we can Unfreeze them following the same procedure as above.

How To Freeze Panes in a Microsoft Excel Spreadsheet?

Freeze First Column: Keep The First Column Visible While Scrolling Through The Rest Of The Worksheet. No matter which Cell is activated, by using this command the First Column of the Spreadsheet will remain visible while scrolling towards the left in the Spreadsheet. Once used we can Unfreeze them following the same procedure as above.

How To Freeze Panes in a Microsoft Excel Spreadsheet?

So, for example, if we want the First Row in our Spreadsheet that contains Headers to remain visible as we scroll down in the Spreadsheet, we then use the Freeze First Row command. Freezing Panes with Splitting Panes are two different commands. While Freezing Panes allows us to keep Rows or Columns visible while scrolling in the Spreadsheet, Splitting Panes divides the Spreadsheet into two or four areas where we can scroll in them separately.

Go ahead can check out the video describing How To Freeze Panes in a Microsoft Excel Spreadsheet?

and …

To Find Out More About Microsoft Office Applications You Can Subscribe To My YouTube Channel!!!

Subscribe


Πώς Να Ταξινομήσετε Δεδομένα Σε Ένα Φύλλο Εργασίας του Microsoft Excel;

Posted on Updated on

Microsoft Excel Blog Banner

How To Sort Data in a Microsoft Excel Spreadsheet?

Όταν θέλετε να Ταξινομήσετε Δεδομένα (Sort Data) σε ένα Φύλλο Εργασίας (Spreadsheet) του Microsoft Excel, αναδιατάσσονται οι Γραμμές (Rows) με βάση τα περιεχόμενα της συγκεκριμένης Στήλης (Column). Μπορεί να θελήσετε να Ταξινομήσετε (Sort) έναν Πίνακα (Table) έτσι ώστε να καταχωρηθούν τα ονόματα με αλφαβητική σειρά. Ακόμα μπορεί να θελήσετε να Ταξινομήσετε (Sort) τα Δεδομένα (Data) με βάση το Ποσό (Amount). Για παράδειγμα, από το μικρότερο στο μεγαλύτερο και αντιστρόφως.

Πώς Να Ταξινομήσετε Δεδομένα Σε Ένα Φύλλο Εργασίας του Microsoft Excel

Εάν Θέλετε Να Μάθετε Πώς Να Ταξινομήσετε Δεδομένα Σε Ένα Φύλλο Εργασίας του Microsoft Excel; διαβάστε την παρακάτω ανάρτηση.

Read the rest of this entry »

How To Sort Data in a Microsoft Excel Spreadsheet?

Posted on Updated on

Microsoft Excel Blog Banner

When we want to Sort Data in a Microsoft Excel Spreadsheet, it rearranges the Rows based on the contents of a specific Column. We may want to Sort a Table so that we can enter names in an alphabetical order. Or even to Sort the Data based on the Amount, like from smallest to the largest and vice versa.

How To Sort Data in a Microsoft Excel Spreadsheet

If You Want To Learn How To Sort Data in a Microsoft Excel Spreadsheet, read the post that follows.

In the image below I have Converted a Range of Cells into a Table in a Microsoft Excel Spreadsheet. During the procedure I have defined that my Table has Headers, and we can see the Filter buttons at the right of each Header. In the example below, we can see the Filter buttons next to the following Headers: Material No., Title, Pack Type, Language and Price. If somebody wants to refresh their memory on How To Convert A Range Of Cells into a Table you can read a previous post of mine here.

How To Sort Data in a Microsoft Excel Spreadsheet?

We must activate a Cell in the Column that we want to Sort. For example, if we want to Sort by the Column Material No., we must activate a Cell in that Column. If we want to Sort by the Column Price, we must activate a Cell in that Column.

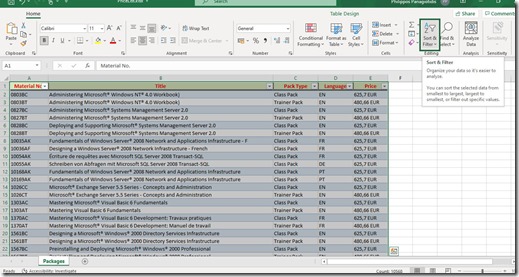
Then, from the Home Tab of the ribbon and from the right area we locate the area named Editing as shown. Then we select the command Sort & Filter where we are notified with the following: Organize Your Data So It’s Easier To Analyze. You Can Still Sort The Selected Data From Smallest To Largest, Largest To Smallest, Or Filter Out Specific Values.

How To Sort Data in a Microsoft Excel Spreadsheet?

Once we select the Sort & Filter command the drop-down menu appears with the following commands to use:

  • Sort Z To A: By selecting this command our Data will be sorted alphabetically from Z to A.
  • Custom Sort: It will be described below.
  • Filter: By deactivating it, the Filter buttons will be removed from the Headings. To activate the Filter buttons again we must activate it.
  • Clear: By selecting this command it will Clear the Filtering.
  • Reapply: By selecting this command the Filtering will be reapplied to the Table.

How To Sort Data in a Microsoft Excel Spreadsheet?

In the image below I have applied the Filter From Z To A.

How To Sort Data in a Microsoft Excel Spreadsheet?

If we want to create a Custom Sort Filtering, we must select the Custom Sort command from the drop-down menu of the Sort & Filter command as shown and where we are notified with the following: Choose More Options, Such As Sorting By Multiple Columns Or Rows and Case-Sensitive Sorts.

How To Sort Data in a Microsoft Excel Spreadsheet?

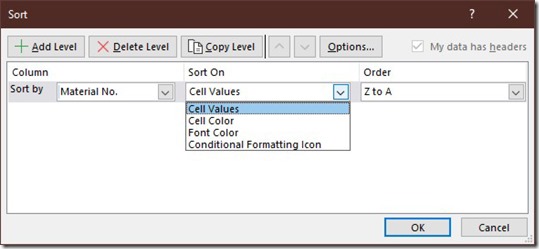
Once the Custom Sort command is selected the Sort dialog box appears as shown below. In this dialog box we have the following commands available to use:

  • Add Level: If we want to Sort our Data on more of one Column, we use this command to add another Column. For example, in the dialog box we notice that the Data will be sorted by Column A (Material No.). By Adding another Level, we can define another Level. For example, Column E (Price). The sorting will be done first by Column A and then by Column E.
  • Delete Level: We can delete the Level or sorting that we have added.
  • Copy Level: By using this button a Copy of the selected Sorting will be pasted beneath.
  • Up and Down buttons: We can rearrange the criteria of Sorting by moving them up or down.
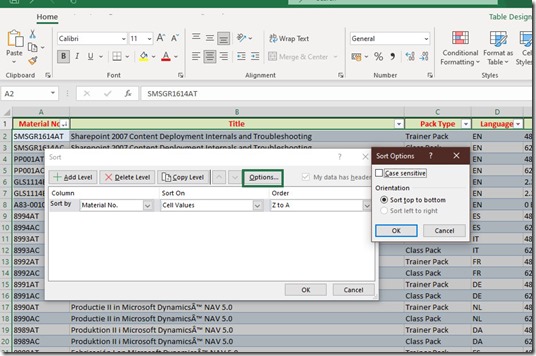
  • Options: By using this button, the Sort Options dialog box will appear where we can activate the command if we want to Sort by Case Sensitive or we can change the Orientation to either Sort Top To Bottom or Sort Left To Right.
  • My Data Has Headers: We can activate or deactivate the check box knowing if our Data has Headers or not.

How To Sort Data in a Microsoft Excel Spreadsheet?

We can define on how we want to Sort On the Data in the Column either by Cell Values, Cell Color, Font Color and Conditional Formatting Icon.

How To Sort Data in a Microsoft Excel Spreadsheet?

And finally, we can define the Order of the Sorting either by A To Z, Z To A or Custom List.

How To Sort Data in a Microsoft Excel Spreadsheet?

In the image below, from the Sort dialog box I have activated the Options button, where the Sort Options dialog box appeared with the commands described above.

How To Sort Data in a Microsoft Excel Spreadsheet?

Whatever adjustments we make, we must press the Ok button for the Filter to be applied. The whole procedure gives us the ability to Filter a Column of Data so we can separate the key components that we need. It is an amazing tool for analyzing data.

Go ahead can check out the video describing How To Sort Data in a Microsoft Excel Spreadsheet?

and …

To Find Out More About Microsoft Office Applications You Can Subscribe To My YouTube Channel!!!

Subscribe